Showing posts with label Anthony's Paper Craft. Show all posts

Thursday, March 25, 2021

Crafty Elves' Countdown to Christmas / March 2021

March is here and it's feeling like Spring but that doesn't mean you can't be getting ready for the holidays !! Michael, Lisa and I are back with our cards as the Crafty Elves Countdown to Christmas As always, I'm excited to see what they make because it always inspires me. I hope that we all inspire you too !!


I've been working full-time during this past year of COVID and creativity is my bliss.. I enjoy looking through all of my holiday stamps and choosing  what I'll be using for my cards. This is the first month that I wasn't sure if I've used a stamp before or not.. I guess I should have kept a list !! Maybe that will be a project for the coming week..


  • This Paula Best "Cat Christmas Tree" stamp is a favorite. I'm not sure if I've used it before  in these posts!! Her stamps are no longer available except on Etsy or eBay etc.. I feel lucky that I have quite a few of them.
  • It was stamped on Strathmore Watercolor paper with Gina K Jet Black Amalgam Ink and colored with my COPICS. 


  •  

    • I made a mini-slimline card with a piece of fun tree paper. I took a 6x6 piece and folded it in half. I am challenged filling all the space of a traditional slimline card so this mini size is perfect !!
    • I used a hexagon paper punch and punched out 7, using coordinating Christmas design paper. I adhered them to the left side of the mini-slimline  in a wreath pattern - using the landscape positioning. 
    • The snowman is from the Snowman Trio 2 set from Anthony's Paper Craft . It was stamped with Gina K Jet Black Amalgam Ink next to the hexagon
    • I cut apart a Tim Holtz Idea-ology sentiment and adhered it next to the snowman on the right side of the card. 
    • Red and green rhinestones were placed above and below the sentiment. 


    • This stamp was designed by mu friend, Lindsay Ostrom ! She is a Hallmark movie lover and I absolutely love this stamp - Hallmark Season from Impression Obsession.
    • It was also stamped with Gina K ink on watercolor paper and colored with my COPICS.
    • I used some strips of washi above and below the stamped image. 
    • A Tim Holtz Idea-ology sticker sentiment was placed beneath the stamped image. 
    • Th cute border - stamped and die cut - at the top of the card is from Close To My Heart.


    • This Starry Forest Die Cut Set caught my eye as soon as I saw it !! I was lucky that it was during a Spellbinders sale . I never pay more than $10 for an item during these sales and sometimes find very detailed die sets for $5 or less. 
    • I cut the images out of different colored cardstock and also from a gold metallic paper. 
    • I used several scrap papers to create a background scene and adhered them to a Kraft card base.
    • The images from cardstock were adhered to the  metallic images, leaving a small golden edge showing .
    • The images were adhered to the card base. I used the example on the Spellbinders packaging .. 
    • A Paper House Productions Merry and Bright 3D sticker was placed on the upper left of the finished panel. 
    These were fun cards to make and are a nice addition to my holiday stash !!  Take a look over at Michael's and Lisa's blogs to see what they have created for March. In the upcoming months we will have some Guest Elves joining us and are so excited to see what they create !!


    Comment on this post and I will choose someone at random and send them some fun holiday supplies to make a few holiday cards of their own !! Until next time, stay creative and above all,  STAY SAFE !!


    Debra Davison / Meticulosity

    Wednesday, November 25, 2020

    Crafty Elves' Countdown to Christmas / November 2020

    I think that every year we ask ourselves where the time has gone. In the blink of an eye, it's November and holiday season is here. We are down to the wire with holiday cards. I just received my first Christmas card from England yesterday !! Plus we are all still living with COVID-19 and that has changed how our holidays are looking this year. I know that I am so ready for 2020 to be over and hope that 2021 is a better  - and healthier - year for everyone !!


    I used a variety of stamps this month - both old and new favorites !! My first card uses a fun new stamp from Anthony's Paper Craft Snowball Stand - and also a new sentiment set  - Christmas Greetings 3 . This stamp will be sent to you for free if you spend  $30 or more from Black Friday through Cyber Monday at. Anthony's Paper Craft.  All stamps will be 25% off and US customers will get free shipping if you spend $50 or more. 


    • I stamped the  Snowball Stand on a piece of Strathmore Marker paper and also on a piece of wood-grain paper.
    • The stand was cut out of the wood-grain paper  and adhered on top of the marker paper image. 
    • The snowman and snow outlines were colored with my COPIC markers. 
    • I stamped the sentiment in ColorBox Scuba Distress ink  onto a piece of pale wood-grain paper and adhered it to the top of the stamped panel .
    • I had also stamped an extra sign on marker paper and popped that up on top of the snowball stand.
    • I placed some glitter highlights on the snow and on several snowballs.
    • The completed panel was adhered to a blue card base. 


    • The Christmas Clothesline  and sentiment were stamped on a piece of Strathmore Marker paper and then  colored with my COPICS.
    • I cut the paper to fit on the front of a pale green card base .
    • A piece of thin silver metallic washi was placed between the clothesline and sentiment.
    • I love the simplicity of this card.


    • I stamped the Xmas Mitten onto a piece of Marker paper and also on a piece of watercolor paper.
    • I cut the mitten out of the watercolor paper and colored it with my COPICS.
    • The contents of the stocking on the Marker paper were colored with my COPICS .
    • The sentiment was stamped on watercolor paper and then trimmed .
    • I adhered the sentiment next to the Mitten and the watercolor Mitten over the matching stamped image. They were popped up with foam tabs.
    • The stamped panel was adhered to a pale green card base.
    • Sequins were adhered around the Xmas Mitten.


    • I stamped the Koko Girl and sentiment from the Erin Lee Creative Koko Girl Cocoa Stamp & Die Set on watercolor paper.
    • The girl was cut out with the matching die .
    • I colored the girl with my COPICS .
    • I cut the sentiment to fit at the top left of the card.
    • The sentiment was matted with a piece of dark green scrap paper.
    • A piece of glittery snow scene paper was adhered to a pink card base.
    • The girl was popped up with foam tabs towards the lower right side of the card.
    • The sentiment was popped up with foam tabs at the top left.

    I'm sure that the other Crafty Elves  - Michael and Lisa -  have created some fabulous cards for November !! You can check out their blogs here  -

    Michael Trent - World of Michael Trent
    Lisa Reynolds Bzibziak - Life of a BZScrapper


    Have you started your holiday cards yet ? Are you even sending cards this year ?? What a crazy year it has been !! I will be happy to put this year behind me and get on with 2021. It just has to be a better year .. Thank you for visiting Meticulosity once again .. We will be back on Christmas Day for our 2020 wrap-up  and hope that you will join us.  Until then, stay safe and creative !!


    Debra Davison / Meticulosity


    Wednesday, February 19, 2020

    February Cookies / 2020 - 2

    Another challenge is here over at the If You Give a Crafter a Cookie Challenge Blog and this one  - # 136 - is all about Celebrations !! Get inspired by our cookie photo this time and link up a project of your own before March 5. I am currently at home with the flu and a nasty bronchitis so this post will be short and sweet.. 


    For my card I used stamps from Anthony's Paper Craft. I am a member of their Design Team also and these are 2 of my favorite stamp sets. Village Set 3 was used for the diner image and Sentiments by DeZinesbyEM  provided the sentiment and cake slice.

    • I had a fabulous Retro paper pad by American Crafts - Sparkle City Project Pad  - that included papers and stickers. The diner was stamped with Versafine Clair Nocturne Ink on a piece of cloud-patterned paper, leaving the cool dotted border at the top.
    • The sentiment was stamped above the diner with a Bahama Blue Memento Dew Drop ink .
    • I placed a fun retro arrow sign at the top of the dotted border, pointing down to the diner. 
    • The cake slice was an afterthought when the card was completed but I think it was the perfect touch !!
    • Images were colored with my favorite markers - a variety of Tombows, Faber-Castells & Staedtlers. 
    • I mounted the completed stamped image onto a multi-colored blue card base.
    Thank you for stopping by to see my latest post !! Please take a look at all of the other team member's projects over at the main BLOG. We would love for you to link up something of your own too !! The Challenges run for 2 weeks.

    This diner stamp reminded me of the Beacon Diner in Hometown, PA. I spent many hours here with my family as a child !! This post brings back some wonderful memories..


    Until next time - Stay Creative !!


    Debra Davison / Meticulosity

    Friday, October 25, 2019

    Crafty Elves' Countdown to Christmas - October

    When I decided last year to make a Christmas card each week to avoid the holiday rush,  I was hoping that it wouldn't fall by the wayside like New Year's resolutions.  But when Lisa  - of Life of a BZScrapper - decided to join me, I was pretty sure it would be a success !! And now here we are, 10 months later, almost finished with our year . Yes,  the Crafty Elves are still going strong and are excited to show you our October cards.


    For my cards this month, I used several square dies from my collection. Two of the cards have no stamping on them . It's been easier than I thought to come up with new ideas each week, My first card is an expression of my love for snail mail !! 


    • I die cut a scalloped lace square from watercolor paper.
    • A Doodlebug Design Inc. cardstock sticker "Dear Santa"  set was used to create a scene in the die cut square.
    • A Merry Christmas sticker from my stash was placed at the top of the scalloped square.
    • Red candy dots were placed at each corner of the square.
    • The scalloped square was popped up with foam tabs onto a green card base.

    • I stamped, die-cut and then colored images from the Sizzix Dove Framelit Set .
    • Versafine Clair Nocturne ink was used for all stamping.
    • Using a Tim Holtz Stitched Square Die, I cut a square to fit on the front of my card.
    • The dove and HOPE images were adhered to the stitched square with my Tombow MONO Adhesive+.
    • The holly were adhered on either side of the HOPE sentiment with foam tabs.
    • This card was made for my friend Chrissy who just had surgery for breast cancer. 

    • I stamped the 3 images from the Christmas Set 1 by Anthony's Paper Craft onto die-cut squares. Two were Stitched Squares  die-cuts and one was plain.
    • The images were colored with a variety of my favorite markers. 
    • A bit of shimmer was added with my Clear Wink of Stella Glitter Brush and a Sakura Stardust Jelly Roll pen.
    • The squares were placed on cream card bases, popped up with foam tabs. 
    • These cards were made by me for the Make n Take at StampScrapArtTour in Hampton, VA this past weekend. I was at the Anthony's Paper Craft booth as a member of their Design Team.

    beautiful memories from ordinary moments
    • On a cream card base, I adhered a snowglobe made with Pinkfresh Studio Snowglobe Elements .
    • A sentiment from Pinkfresh Studio's cardstock sticker collection was placed below the snowglobe. 
    • A strip of thin green washi was placed down the left side of the card. 

    I know that Lisa has been busy with her cards . You can see her wonderful creations over  at her blog - Life of a BZScrapper . Have you started your holiday cards yet ?? Do you send many ? We are excited that we will be ahead of the holiday rush, at least as far as Christmas cards are concerned !! Comment on this post for a chance to get a bit of holiday snail mail from me . And come back next month for more cards from me and Lisa. 

    Until next time, Stay Creative !!

    Debra Davison / Meticulosity

    Thursday, September 26, 2019

    A Little Bit of Fall with Anthony's Paper Craft

    I'm posting a card with a new release from Anthony's Paper Craft. As soon as I saw this stamp set, I knew that I wanted to paper piece with it !! I got out an older Recollections AUTUMN paper pad  found on clearance at Michaels and knew it would be perfect . Gorgeous golds and burnt oranges filled this card with fall splendor !!

    Wake Up and Smell the Flowers

    • The floral images from Circle Flowers  were stamped on Strathmore Cold Press Watercolor paper and also on several colors/patterns from the Autumn Recollections paper pad.  I used Versafine Clair Nocturne Ink to stamp the flowers and the sentiment.
    • I cut the watercolor  paper flowers into circles and then fussy-cut the Autumn colored flowers  around the floral outline.
    • Using my Art Glitter Glue, I adhered the patterned flowers to the corresponding watercolor circles.
    • I colored in a few areas of the flowers with my glitter pens and Faber-Castell markers.
    • The Circle Flowers were adhered to a dotted Kraft card base using my Pink Scotch ATG Gun.
    • The sentiment was also stamped on paper from the Autumn paper pad, cut out with a square punch and then highlighted with golden rhinestones.

    You can see all of the new releases from Anthony's Paper Craft here . There is also a Stamp of the Month  and if you add it to your cart, you will get free shipping through September  ( USA only ). The stamp is  Mandala 5  ( aka Broach 5 ).


    My fellow Design Team member, Michael Trent is also posting today so be sure to check out his blog - World of Michael Trent . His cards are always fabulous and I can't wait to see what he comes up with this time !! There is a wide variety of stamp designs in Anthony's Paper Craft's latest release - florals, nautical, cupcakes, a church and some cool Zen shapes to play with . Add some to your cart along with the Stamp of the Month for the free shipping !! 
    Thank you for visiting Meticulosity .. 
    Until next time, stay creative ...

     Debra Davison / Meticulosity

    Thursday, July 25, 2019

    Crafty Elves' Countdown to Christmas - July

    It's Christmas in July for the Crafty Elves !! Lisa - aka BZScrapper - and I have been making  a Christmas card each week / 4 or more each month and blogging about it on the 25th of each month . It's been a challenge for me to make holiday cards this month. Here in Virginia Beach, we have had temperatures in the high 90's for a few weeks and to tell you the truth, I was not in a Christmas mood. But I actually did play some holiday music and use a Christmas coffee mug while making a few of these cards to help me get in the holiday spirit. This post will combine a few different  Design Team projects for me as you will see in my descriptions. After you see my cards, be sure to stop by Lisa's blog to see her always  amazing creations !!


    For my first card, I used a Hero Arts set - Origami Happy Holidays . I stamped the paper airplane image onto green and red patterned paper and also Neenah Stardust White cardstock. They were then fussy-cut and adhered to an embossed white card. I stamped a sentiment from the same stamp set onto a piece of snowflake patterned paper, cut it out with a tag punch, stapled it and then adhered it to the bottom right side of the card. This was made for my Italian penpal and friend, Letizia !! She recently bought a fun custom stamp with her address and a paper airplane on it, so this set immediately made me think of her !!


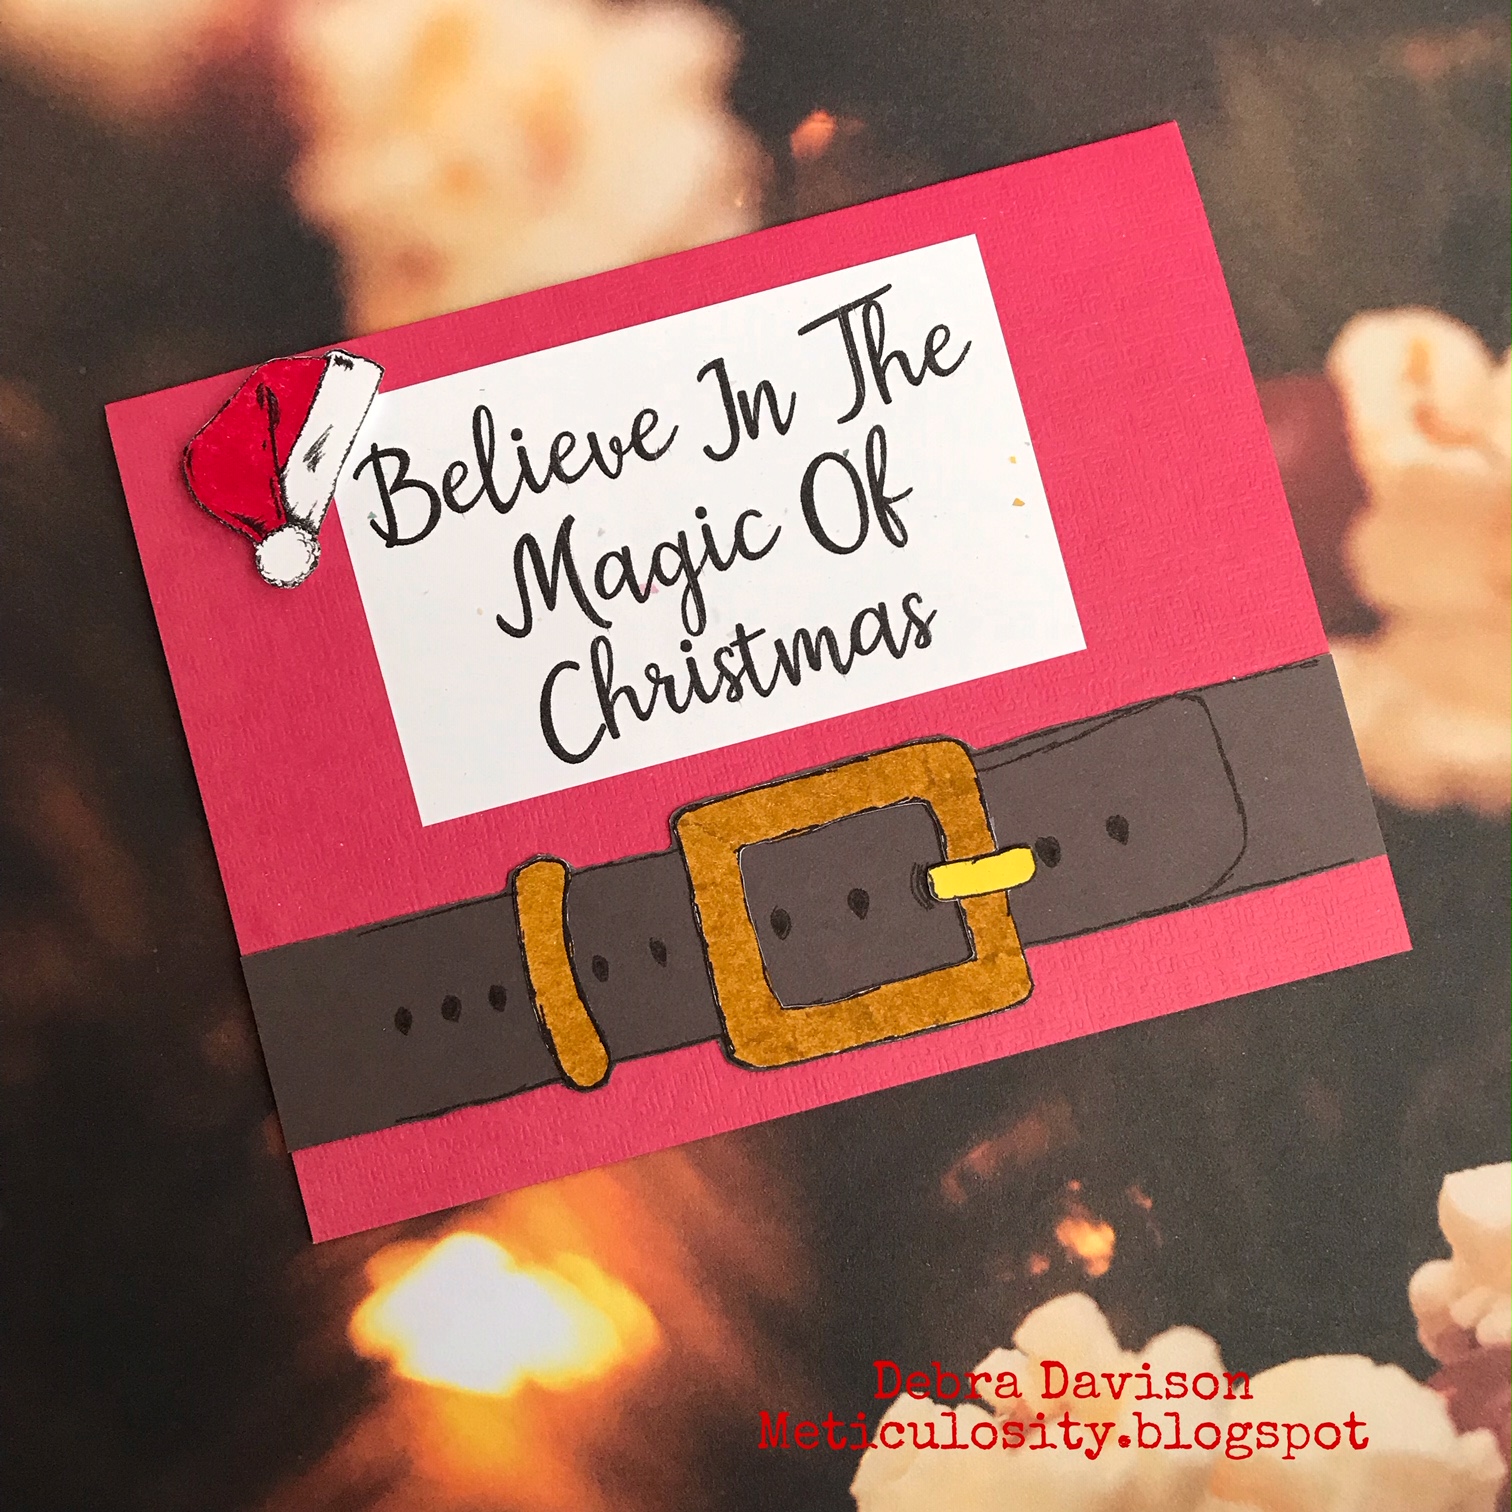
    My next card is made with a fun digi stamp set from Polka Dot Orchard - Magic of Christmas . It was designed by my very talented friend and teammate on the Polka Dot Orchard Design Team, Crystal Minkler. We are having a Christmas in July Instagram Blog Hop with the Polk Dot Orchard Team starting today and we hope that you will join us. You can find my post at @djdavison814 on  IG and follow through from there. For this card, I printed the belt, sentiment and Santa hat. The belt was printed on both white and a gray-brown cardstock. I cut out the belt from the gray paper and the buckle and belt loop from white cardstock.The buckle and loop were then colored and adhered on the belt. The Santa hat was also colored.I adhered the sentiment and belt to a red card base.  I then popped the Santa hat up on the corner  of the sentiment with foam tabs. This was a fun card to make !!

     . 

    My next card was made with a few favorite stamps from Rubber Moon  -  Merriment by Kae Pea and a house stamp by Joanna Taylor. The house stamp I used is no longer available but the Snowman's House stamp is almost identical. I stamped the Merriment moons on  the top left side of a piece of snowflake patterned paper. The house was stamped on a piece of watercolor paper, colored, cut out into a square and adhered to the lower right of the snowflake paper.  I then stamped the word "merriment" under the house image. I had also stamped the moons on a piece of patterned paper, cut them out and adhered them to the snowflake paper ( I colored one of the moons yellow ). The snowflake paper was adhered to a Kraft cardstock base and a piece of Watercolor Words washi by Rubber Moon was placed down the left side of the card. I love making holiday cards in non-traditional colors !! Do you have a favorite color combo for holiday cards besides red and green ??


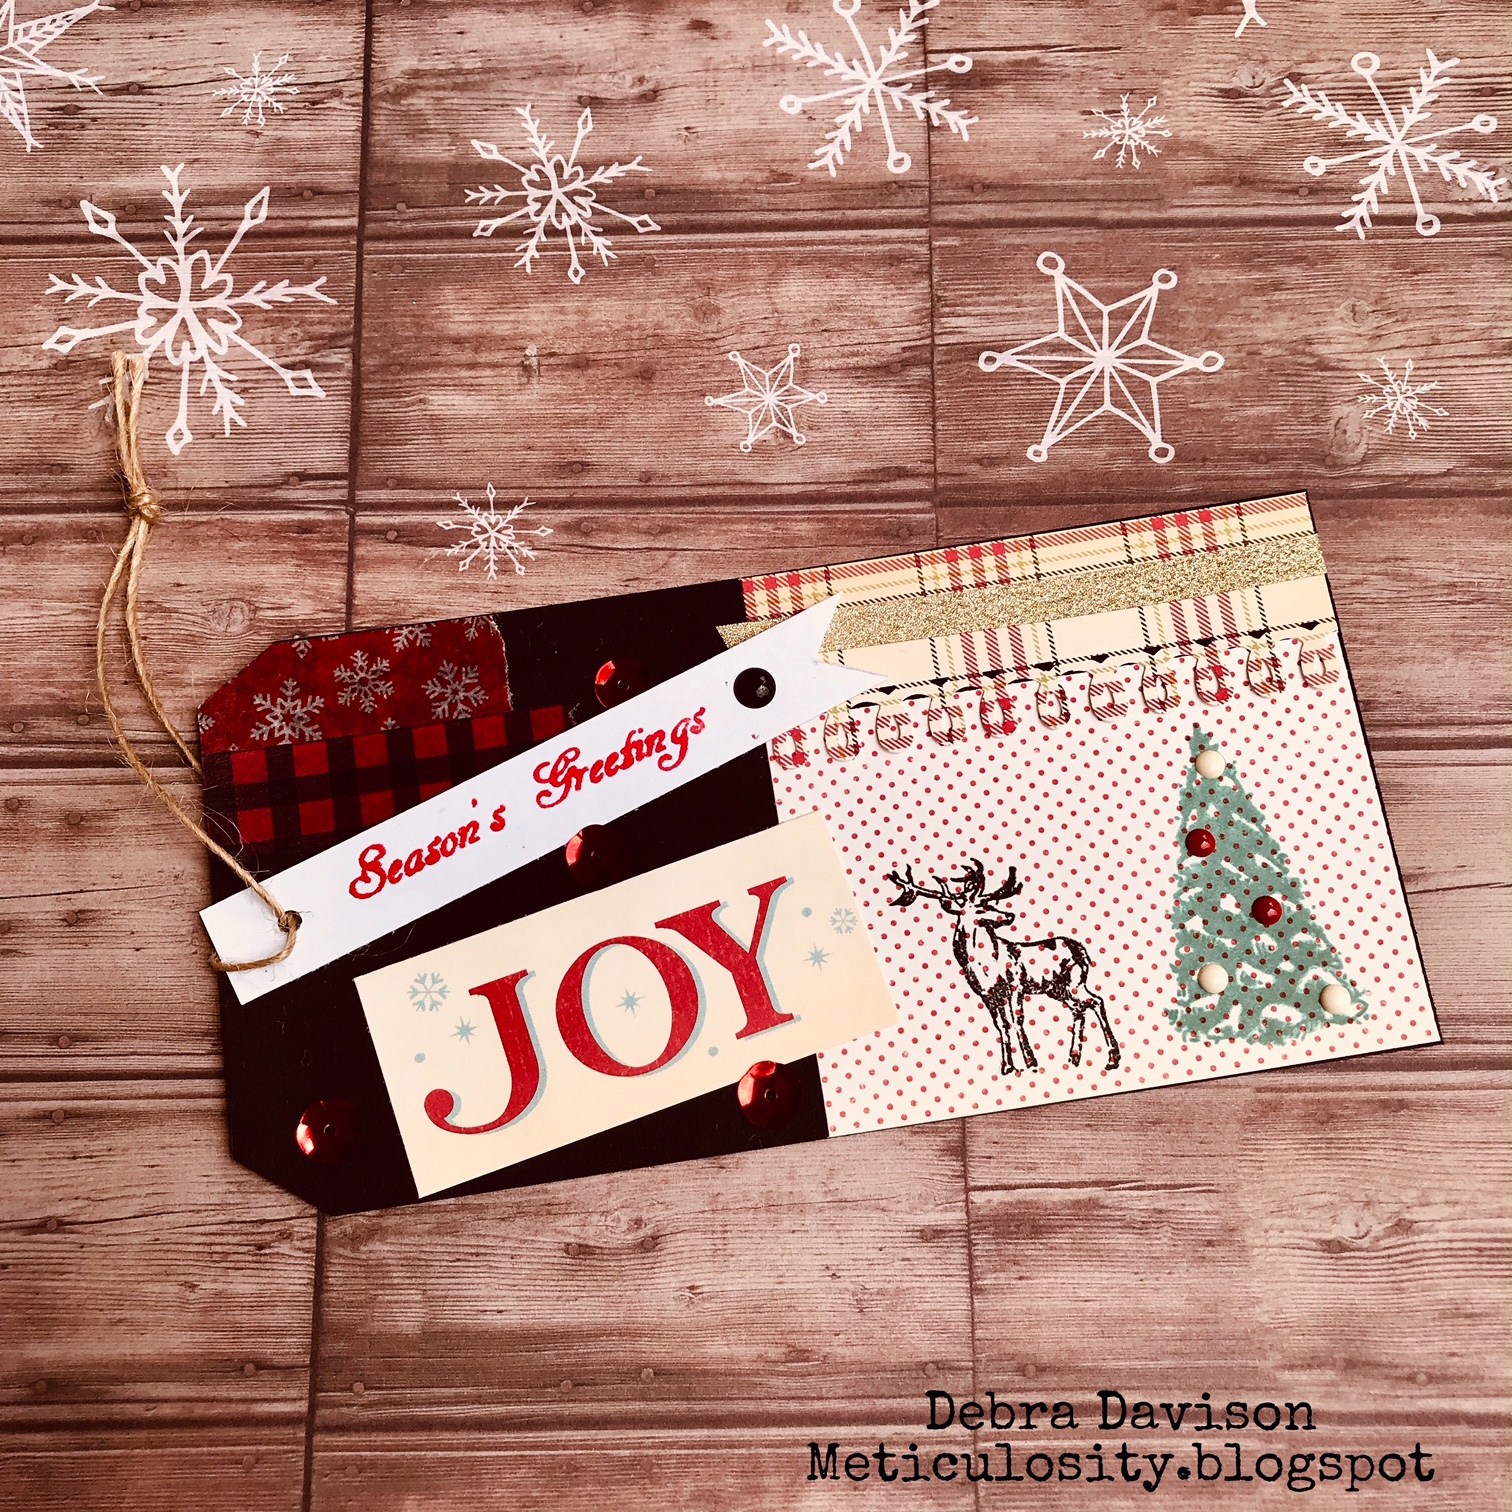
    Last but not least is a card/tag for my Christmas in July post at Anthony's Paper Craft. The team is also celebrating Christmas in July by using  some fabulous holiday/Christmas stamps . I used the Winter Scene stamp set that has an amazing variety of smaller stamps suitable for  tags and cards !! I stamped a tree and a deer onto a piece of dotted paper , then used a fun paper punch to make a plaid border that I adhered above the tree. A piece of gold glitter washi was then placed on the plaid border. This entire image was adhered to the bottom half of a black tag. On the upper half of the tag, I adhered a few pieces of washi - snowflake and plaid. The word JOY was adhered at an angle next to the deer.  I then stamped "Seasons Greetings" onto a piece of white cardstock, made a banner out of it and hung it from the hole in the tag.I adhered a  piece of ledger paper to the back of the card to write a holiday greeting on. 


    Thank you for joining me for this celebration of Christmas in July.  I really am thrilled to be on several fabulous Design Teams and it was fun to combine these 4 projects in this post !! Make sure you go to Lisa's blog  - Life of a BZscrapper to see what she came up with this month !!

    Thanks so much for visiting Meticulosity as we try to inspire you into some holiday spirit as we create a Christmas card each week. We hope to see you back here again on August 25 !!

    Until then, Stay Creative !!!


    Debra Davison / Meticulosity


    Thursday, July 18, 2019

    Christmas in July 2019 with Anthony's Paper Craft

    It's Christmas in July over at Anthony's Paper Craft and I always love getting out my holiday stamps .  This weekend, there's an even better reason to think about the holidays!! From July 19 through July 21, all in stock stamps at Anthony's Paper Craft are 20% off.  So take a look at all of the wonderful stamps and have fun putting them in your cart..

    Anthony's Design Team is showing off the holiday stamps all month . Today it's my  turn and I used one of my all-time favorite stamp sets - Winter Scene . I sometimes send tags as Christmas cards  and these were so much fun to make !! I write on the back of the tag and the twine even lets the receiver hang it on their holiday tree.  These tags allowed me to use some of my stash of holiday washi too -- always love a reason to do that !!


    • I started with 2 Kraft tags. To me, Kraft is a perfect cardstock for a great vintage feel on your holiday projects.
    • I stamped several elements from the Winter Scene stamp set - some directly onto the Kraft and others on patterned paper.
    • I am in love with that Happy Holidays sentiment that I used on both tags !!! I colored in some of the letters with my fine Sharpies. 
    • The patterned paper I used is from my stash of October Afternoon paper pads - Make It Merry Holiday Style.
    • The scene with the trees was built with a tree/mountain die and the cute snowman image .
    • Paper banners were punched out and strung across the Celebrate the Season tag, placing a black candy dot at each corner.
    • The white tags hanging from each of the Kraft tags were stamped with sentiments from the Christmas Sentiments 1 set .
    • Wood-grain and Snowflake patterned washi was placed on the Peace, Love & Joy tag .
    • The circle on the Celebrate tag was punched from the October Afternoon paper and a red candy dot was placed at the bottom of the circle.
    I hope that you are inspired by my holiday tags, There are many fun holiday stamps at  Anthony's Paper Craft - take a look at these and all the other  available stamps. The 20% off sale will rum from July 19 through July 21.

    I'm trying to beat the heat here in Virginia Beach by staying indoors and creative. I hope your weather is a bit cooler. Think snow and the holidays and get crafty this weekend !! 

    Thank you for visiting Meticulosity ..

    Debra Davison / Meticulosity

    Thursday, June 20, 2019

    Set Sail With a Good Book

    This month, Anthony's Paper Craft is highlighting the Nautical 1 stamp set as the June Stamp of the Month. If you add this to your cart during the month of June, you will receive free shipping on your entire order in the United States. So now is the time to add this set and a few others to your "must-have" list and place an order .  

    It's been a hectic few months here and there hasn't been much creative time. But at the end of every day, before bed, I always try to read a few pages of a book.  I have many friends online who are avid readers and I get great ideas for new reads from them.  I also love bookmarks and even keep them in my e-readers. I wanted to make a bookmark I could write on and keep track of books I've read and also those I want to read . 

    The book Wicked Deep by Shea Ernshaw seemed the perfect book to place my new bookmark in . I've already read it once and have been going through it again.  I'm also looking forward to her new book Winterwood to be released in November. 


    • I started by cutting a piece of Bazzill Robin's Egg Marble cardstock to the size I wanted my bookmark to be. It turned out to be 8.5 x 3 inches. 
    • The front of the bookmark is text paper and the back is ledger paper - both from the amazing paper pad from DCWV - Maps, Text & Ledgers Stack .This pad is worth your while if you love stamping on patterned paper and also to use as backgrounds !!
    • Versafine CLAIR Nocturne ink was used to stamp all the images from Nautical 1 . I placed the lighthouse, compass, ship's wheel  anchor and sentiment on the text paper and the compass on the ledger paper.
    • Various patterns of  Ahoy  washi tape from Nicole ( found at AC Moore ) were placed across the text and ledger stamped papers.
    • I used some planner stickers to place 2019 on the front of the bookmark. 
    • The patterned papers were adhered to the Robin's Egg Marble cardstock with my Scotch Pink ATG Runner.


    I am already making more of these bookmarks for friends of mine. The stamps in Nautical 1 are the perfect size and I love using the text and ledger papers to stamp the images on. Be sure to check out this  Stamp of the Month at Anthony's Paper Craft for free U.S. shipping through June 30.  My teammate Mary Kay Werry has also used Nautical 1 this week to make some fabulous cards - you can find her creations here at MKW Cards

    So, set sail with a good book and leave me a comment about your latest favorite read !! I'm pretty sure I'm  not the only bookworm among my crafty friends !! And until next time, Stay Creative ..


    Debra Davison / Meticulosity
    Anthony's Paper Craft Design Team


    Wednesday, January 23, 2019

    Anthony's Paper Craft Feb. 2019 New Release Blog Hop

    Anthony's Paper Craft has some fabulous new stamps coming out in a February Release and this week, several members of the Design Team will be sharing a few with you.   I'm excited to see what Michael, Mary and Mike create and will add links to them at the end of this post. 

    I actually chose this stamp because it reminded me of a song I heard on the TV show THE WALKING DEAD. Weeds or Wildflowers by Parsonfields is the first thought I had when I saw thie sentiment with this new stamp and I just had to use it for this Hop. 


    May All Your Weeds Be Wildflowers


    • I started with a 5x7 kraft card base for this card.
    • Tim Holtz washi tape was placed down the Left side of the card base- a strip of dark red striped and a thin strip pf gold glitter tape.
    • I stamped the flower image of the FLORAL BACKGROUND 3 stamp onto a piece of cream-colored brick patterned paper  ( found at Hobby Lobby in a single sheet ).
    • The sentiment was stamped onto a piece of floral brick paper, using a piece from the Country Road Paper Pack ( also found at Hobby Lobby ) . Both were stamped with a Versafine Clair "Nocturne" ink pad .
    • I colored in some of the  floral image with a variety of Tombow Dual Brush Pens . I loved the contrast of the crisp black ink on the brick wall and didn't want to color too much of the design  or make it too bright. I used colors that matched the brick pattern that the sentiment was stamped on.
    • The sentiment was trimmed to fit in the space above the floral image and popped up using foam circles.

    This Floral image is just one of many new releases that will be available from Anthony's Paper Craft in February. I hope that you like my sneak peek and that you will also go and look at those done by my teammates at the links below. I am sure you will be inspired !!

    Michael Trent - World of Michael Trent
    Mary Kay Werry - MKW Cards
    Mike Fernholz - Dezines By EM

    I hope that you enjoyed my card using an upcoming release by  Anthony's Paper Craft . I will let everyone know when the stamps are available for purchase. I'm sure we will be posting more samples throughout January so be sure to follow Anthony's Paper Craft on Facebook.  


    Thank you again for visiting Meticulosity.


    Debra Davison

    Friday, January 18, 2019

    Valentine's Day @ Anthony's Paper Craft

    Hello to everyone - I'm so happy you've stopped by for my first post of 2019 !! What better way is there to start off the New Year than with a fun heart-filled project. Today I'm using the January Stamp of the Month from Anthony's Paper Craft - Valentine's Day 2 . If you purchase this stamp through the month of January, you will get free shipping/ USA only. So why not treat yourself to a few great stamps and take advantage of that perk. 

    I love paper-piecing and this stamp was perfect to use with a cute new paper pad !! I actually made 2 cards , each with a slightly different look at the top. I send quite a few Valentines and this stamp allowed me to use many of my fun patterned papers.


    • Using 4 coordinating patterned papers from the Pebbles "Be Mine" pad , I stamped the Valentine's Day 2 image with  a Versafine Clair "Nocturne" ink pad .
    • I cut the heart and  sprinkle papers to fit on my card bases - 1 bright red and 1 cranberry, They were adhered with Tombow MONO Adhesive+.
    • The heart images were cut out of the doughnut and strawberry papers and adhered to my 2 card base images - 1 of each pattern on each base.
    • Several red and gold glitter hearts were paper-punched and adhered to the center of the patterned hearts.
    • On the top card, I made a border with pale pink cardstock from a Martha Stewart border punch. I placed a piece of heart washi from The Paper Studio across the top area of the border .
    • On the bottom card, I used another Martha Stewart border punch to make a pale pink eyelet border and ran a strand of twine through it, then finished it off with a bow. 
    • I am NOT an expert at tying bows, so I  was completely thrilled with how this one turned out. I placed a bit of glue over the knot so it would not unravel.


    I hope that you like my cards made with this Stamp of the Month. It is a very versatile stamp and some of my fellow Design Team members will also be creating projects with it  Michael Trent has a fabulous card on  his blog, Mary Kay is also posting today over at her blog  and Mike will be sharing his project on the 25. Check them out for some Valentine inspiration.  And don't forget that there is free shipping / USA only when you buy this Stamp of the Month at Anthony's Paper Craft through January.


    Thank you for visiting Meticulosity for this first post of 2019 !! I look forward to many more posts to get your creative juices flowing . Celeste and I will be continuing our blog collaboration this year with our first post on 1/27. And I have another fun collaboration beginning in a few weeks. Please sign up to follow me so you won't miss any new posts. Stay tuned for more great new stamps from Anthony's Paper Craft too .

    I wish all of you a happy, healthy & creative New Year !!


    Debra Davison / Meticulosity


    Wednesday, November 14, 2018

    A Cookie For Santa - Take 2

    The second November Challenge over at If You Give A Crafter A Cookie is full of holiday inspiration !! And it ties right in with the November Stamp of the Month from Anthony's Paper Craft . A wonderful image of Santa holding a chocolate chip cookie that was left for him by the children is a fabulous stamp for your  holiday cards ! And for the entire month of November, if you add this stamp to your basket, you will receive free shipping ( USA only ) .

    I was proud of myself because I used paper scraps to make this card !! I have 2 scrap drawers in a rolling cart - 1 for solid colors and another for patterned paper. I had the plaid papers that I used as well as the snowflake paper. Unfortunately that only reinforces my need to save all those scraps !!

    • I stamped the Santa image on pieces of white wood-grain paper and  a scrap of snowflake paper, using Memento Tuxedo Black ink.
    • I colored the Santa image  and frame border using my favorite Brea Reese markers and Akashiya SAI Watercolor Brush Pens .
    • I cut the snowflake background and adhered it to the wood-grain background.
    • I layered a tartan plaid strip across the center of a  piece of  green plaid paper cut to fit my Kraft card base. I loved that the tartan plaid scrap had navy blue on it to match the lighter blue snowflake background.
    • I wrapped a piece of black checkered ribbon around the plaid papers, tying a bow off to the left side of the card. 
    • The Santa image was adhered to the center of the plaid papers on top of the ribbon,using Tombow Adhesive  -MONO Adhesive + Permanent Runner .
    My fellow Anthony's Paper Craft Design Team members are posting each day this week with this fun Santa image.  You can see the other projects on the Anthony's Paper Craft Facebook Page.. Take a look at all of the great stamps HERE that Anthony's Paper Craft  has to offer , and be sure to add this Stamp of the Month to your cart through November to get free USA shipping. 

    I also want to give a shout out to my Challenge teammates at If You Give A Crafter A Cookie. And to our sponsor this time -Fred She Said. If you link up a project before November 29, you just might win some free digis.  Take a look at the Design Team's inspiration here  from the photo shown below :


    Thank you for visiting Meticulosity for some holiday inspiration !! See you again soon..

    Debra Davison