Showing posts with label Tombow MONO Aqua Liquid glue. Show all posts

Wednesday, April 3, 2019

April Cookies - Take 1

The Inspiration photo for Challenge # 113 from If You Give a Crafter a Cookie is so much fun. There are so many elements to choose when designing your project. Bees, flowers, hexagons, amazing colors -  endless creative possibilities !! We hope that you will be inspired to link up a project before April 18.


I wanted to use the hexagons in my project because I have a cute punch and it was perfect for this Challenge. I only had 1 small bee stamp ( I know !! Can you believe it ?!?!?! ) so searched for a digi stamp and found this cute  Bee Mine Honeybee Girl from Just Me Digital Stamps on Etsy.  I really enjoyed this Inspiration picture !!


Believe in Yourself

  • I began with a pre-made watercolor -look card base.
  • I chose the My Mind's Eye "Howdy Doody" paper pad because it had the wonderful colors from the Inspiration photo in it . Using my hexagon paper punch,  I punched enough hexagons out of 4 coordinating paper patterns for several cards. 
  • The Honeybee Girl was printed on Neenah Stardust White cardstock and colored with Brea Reese & Faber-Castell Markers. The image was then fussy-cut.
  • I arranged the hexagons in 2 rows on the left side of the card - 6 on the far left and 5 for the other.  They were adhered with 1/2 inch Glue Dots.
  • A piece of natural teine was tied around the left side of the card between the hexagon rows.
  • The Honeybee Girl was adhered to the lower right of the card with Tombow MONO Aqua Liquid Glue. 
  • A Wink of Stella Clear Glitter Brush marker was applied to the the girl's shoes and wings for some added shimmer. 
  • Golden rhinestones were added to he ends of the antennae,
  • Believe in Yourself is from Tim Holtz "Quotations" Metallic Stickers. 


Be sure to look at my teammates' projects over at If You Give a Crafter a Cookie , We would love for you to follow us and leave us comments. This Challenge runs from April 4-17 so get started on a card or tag or  other project to link up. We also choose our favorite projects from those linked up. I hope that Spring weather is reaching you wherever you live. After a few dreary, rainy, chilly day here, we are supposed to have temperatures in the 60's and 70's for the next week. 

Thank you for stopping by and taking a look at my card. I hope that you will leave a comment.
And thank you for visiting Meticulosity !!

Debra Davison

Sunday, October 28, 2018

Coffee & Cards with Deb & Celeste 10/27

I try not to always be so darn predictable, BUT October is just full of such amazing Halloween images !! So Celeste and I have invited our friend Michael of  World of Michael Trent to join us again as we create some fun projects for this month's collaboration !! And the theme is Halloween and all things spooky !!!

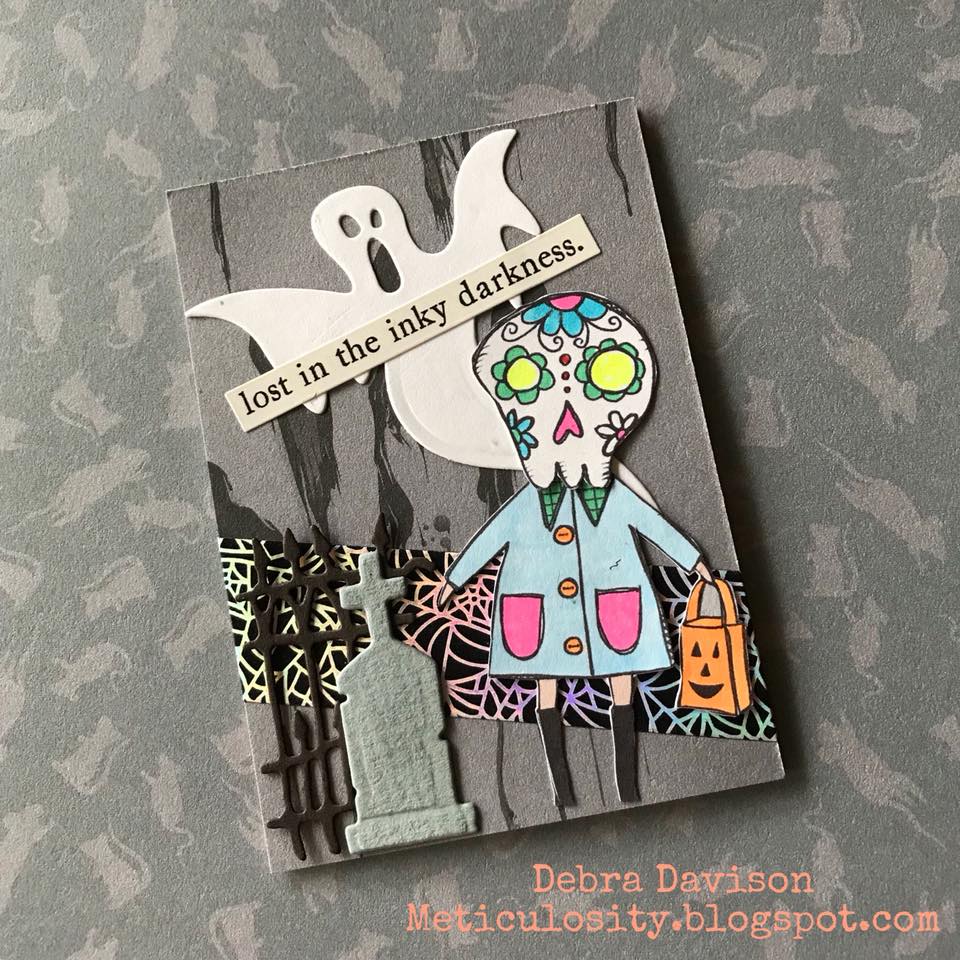
I knew I wanted to use the fun Skullies digi stamps from Vera Lane Studio and then had the idea to pair them with the cute witches from Vera Lane's Bewitchingly Cute set. So, I basically cut the heads off of those cute little witch's bodies and attached skulls !! Sounds like Halloween to me !!!


Lost in the inky darkness ...

Most delicate of beasts ...

  • I adhered Halloween paper from the Love, Nicole " Dark Shadows"  paper pad to 2 ATC cards fronts.
  • The skulls and witches were printed on Neenah Stardust White cardstock and then fussy-cut. 
  • I colored the images with a variety of my favorite markers - Sharpies, Flair pens, Faber-Castell markers and Distress markers - then attached the skulls to the bodies with double-sided tape.
  • I die cut the tombstones, fences and ghosts from the Sizzix Thinlits Die Set "Village Graveyard".
  • I adhered Halloween washi to each card and then attached the fences with tiny staples, positioning the staples where I would be adhering the bodies so that they would not be visible. 
  • I used Tombow MONO Aqua Liquid Glue to adhere the tombstones and skeletons to the ATC cards. 
  • Tim Holtz Idea-ology sentiments/words were placed on each ATC card to match the scene.
  • I adhered another ATC to the back of my finished card to make it a bit more sturdy.
  • I stamped a Handmade Card image from Catslife Press on the back of my completed ATC.
  • A bit of Halloween washi was added to one of the ATC backs.

I really had SO much fun making these ATCs !! They were made for the Monster Mash Swap in the Vera Lane Studio Digi Stamp Group on Facebook.  Vera Lane Studio has the most fun, quirky, unique digi stamps !! Check them out and get inspired !!

I can't wait to see what my fellow crafters come up with for this month's collaboration. Take a peek at Crafting Junky for Celeste's and then head on over to World of Michael Trent to see what Michael has created.  

I have to thank Michael for my choice of coffee cup this time .. He showed me a new cup of his and I remembered one I had bought at Hobby Lobby on clearance sooooooooooooooo - we are cactus  twins !! I am drinking Fortune Cookie coffee  from As of Latte and it is amazing !!


Thanks so much for stopping by to see my ATCs along with Celeste and Michael's projects !! Do you make Halloween cards?? Are you a fan of ATCs ?? I enjoy creating on a smaller medium once in awhile and also joining in on ATC Swaps. Well, my coffee is waiting . Grab a cup of your favorite beverage and get creative.Until next month -- stay creative !!

Debra Davison / Meticulosity

Friday, August 31, 2018

Happy Holly-Days with Anthony's Paper Craft

This is our last  week of Christmas in August Blog Hop posts highlighting holiday stamps from  Anthony's Paper Craft,  Mike, Michael, Mary Kay and I have been showing you our projects and hoping to inspire you to create some of your own. During the month, Anthony is also offering free shipping with a $25 purchase in the US - use the code "freeship25" at checkout.  

  • Using a musical patterned paper from the Tim Holtz Idea-ology Seasonal paper pad, I created a gift card holder from a Sizzix Thinlits Gift Card Bag Die . I absolutely LOVE this die and can tell I will be using it for many things. I like to enclose small goodies in the Snail Mail that I send and these will be perfect for that !!
  • On a black plaid card base by The Paper Studio, I placed a piece of holiday word washi and a piece of red glitter washi vertically down the left edge.
  • I stamped the Holly Sprig image from Anthony's Paper Craft onto a sheet of Neenah Stardust White cardstock and also on some scraps of green patterned paper using Memento Tuxedo Black ink. This is a new image and will be available shortly. Memento
  • I colored the bow and holly berries using a variety of my favorite markers - Sharpies, Kaiser Glitter markers and Akashiya SAI waterbush markers.
  • I fussy-cut the entire image from the Stardust White paper  and clusters of the holly leaves from the patterned paper. I then adhered the leaves to the white cardstock using Tombow MONO Aqua Liquid Glue.
  • I adhered the gift card bag to the card base using my Scotch ATG Gun.
  • The holly sprig was popped upon the gift card bag using Tombow Foam Tabs.


I love the vintage feel of this card and know I will be making many more !!  I'm sure my teammates from Anthony's Paper Craft have created some fabulous projects and I hope that you will check out their blogs to see them. We'd love for you to leave comments and also follow us.


Thank you again so much for visiting Meticulosity and also for letting us all show you some wonderful stamps from Anthony's Paper Craft. Don't forget to use your code for free shipping through August 31 as mentioned above. I had a giveaway on last week's post and the winner is Celeste Goff. She will receive a fun snowman stamp and I can't wait to see what she does with it !!

Debra Davison / Meticulosity

Sunday, April 29, 2018

Coffee & Cards with Deb & Celeste 4/29

Celeste and I are back for our blog collaboration and this month our guest is Maria Giselle. She is a friend of Celeste's and blogs at Maria Giselle's Creative Cuts. They met at a Copic Certification class a few years ago. Celeste chose our inspiration for this month and I'm excited to see what they both created !!


When I think of Spring, I think of sunshine and flowers and bright colors. I knew exactly what I wanted to use for my project - several digital designs from Vera Lane Studio.  I've seen amazing projects made with these digis and was excited to try one for myself !! Vera Lane Studio has an amazing collection of digi stamps and collage sheets. You really should check them out !!


I hope you like my bright, sunshiney Spring card. You can check out Celeste's at Crafting Junky and our guest's at Maria Giselle's Creative Cuts. Leave us a comment and follow us if you don't already.

Today's coffee choice for me is Pecan Praline from Community Coffee. They have amazing coffee and the best flavors !! My cup is one I've had for years with a design of North Carolina lighthouses.  We are very close to the NC border and my guy, Brian is from NC. I actually had been storing brushes and markers in the cup but decided to use it for coffee !!


Thank you for visiting Meticulosity. Celeste and I hope to see you again next month for our May collaboration. May is the 4th anniversary of my blog and I will be having giveaways each week so be sure to follow me to check that out. 


Debra Davison / Meticulosity

Friday, December 8, 2017

A Winter Celebration

Welcome to the first Day of the Winter Coffee Lovers Blog Hop !! The team from Skipping Stones Design will be bringing you some coffee inspiration with projects of our own and I hope you will take a look at all of them here. For my project, I decided to use some hoarded paper, non-traditional colors and a few of my favorite things. So make your favorite cup of coffee, tea or cocoa and relax with some fun inspiration from the Skipping Stones Design Team.


  • I placed a silver doily on the left side of a Recollections snow-flake card base and a strip of turquoise glitter washi down the left edge of the card.
  • The coffee cups from the Funny Coffee stamp set were stamped on several patterns of paper from my hoarded Dear Lizzy Christmas collection from American Crafts, using Memories India Black Ink. The cup handles were also stamped on some plain white card stock, in order to fussy-cut the area inside the handle and then color them to match the card base color.
  • I fussy-cut the coffee cups and added brown glitter to the coffee area. The cups were then stacked along the right side of the card.
  • Using a matching piece of music paper, I stamped the sentiment from the Christmas Song stamp set and adhered it at the top of the card with foam dimensionals. All other elements were adhered with Tombow MONO Aqua Liquid Glue.
  • A piece of rustic twine was wrapped several times along the inner edge of the washi to complete the card.
Doilies, washi, and twine are a few of my favorite elements to use on cards. I love the non-traditional colors of this one !! After the card was completed, I realized that the words on the tag at the top of the card - " Oh, what fun it is to ride in a "  - matched up perfectly with the words on the middle coffee cup - " open sleigh ". Not planned, never even thought of that while stamping or cutting. Just a happy accident, but I love when things like that happen !!

I hope you will also take a look at all of the amazing link-ups at the Winter Coffee Lovers Blog Hop . Thank you for visiting Meticulosity. Please sign up to follow my blog if you haven't already.

Debra Davison / Meticulosity 


Saturday, November 4, 2017

St. Tropez Seas

I am a rubber stamper at heart - I rarely make a card without any stamping at all . I often buy paper and stamp sets from the same collection.  I did that with the Prima Amber Moon collection that I used in a prior blog post.  I bought some paper and the ephemera pack from the Prima St. Tropez collection, not really having any plans for what I was going to do with it. I actually think I ordered it to justify the cost of shipping and then just happened to fall in love with it !!

When I sat down to make cards with St. Tropez, I was planning on looking for some nautical stamps to use with it. But I started cutting and trying out layouts, and before I knew it, I had these beautiful cards !! For once, I didn't feel like adding more and more and more !! The colors and artwork are absolutely stunning. I have a friend, Paula who recently moved to her seaside dream spot and she will definitely be receiving one of these cards.. 


  • These cards could not be any easier, or more stunning..
  • Using Kraft cardstock for the bases, I cut several St. Tropez patterns for backgrounds. 
  • Pictures and sentiments were cut from the St. Tropez collection and chosen from the Ephemera pack and adhered with Tombow MONO Aqua Adhesive Runner and foam tabs. 
  • I used a few strips of thin glitter washi to finish off 2 of the cards. 


" Like the ocean, my love for you has no end "

Thank you for stopping by and seeing what I created today-- without any of my beloved stamps. A bit out of my comfort zone, but I might have to do this for some of the > 100 holiday cards I will be sending !! How many cards do you send ?? Leave me a comment and I might just send you some Christmas goodies to help with your holiday card list !!

Debra Davison / Meticulosity

Lovely seaside town of Dawlish