Showing posts with label Polka Dot Orchard. Show all posts

Tuesday, August 25, 2020

Crafty Elves' Countdown to Christmas - August 2020

I never in my wildest imagination thought that 6 months later, we would still be dealing with COVID .  I miss hanging out at the coffee shop and the bookstore, meeting my friend for coffee every Saturday if I am not scheduled to work,  trying out new restaurants with Brian and  getting out with him when he plays music. I am still being very cautious with trips out mainly to the grocery store and work . I can't risk getting sick. And I see so many who are not being safe.So I stay home and create when I can concentrate . But I'll admit that it gets a bit harder as the months go by.  But here we are again - The Crafty Elves - , inspiring you as we make a Christmas card each week and post them on the 25th of each month . Jessica, Lisa, Michael and I are excited to help you beat the upcoming holiday stress.


This month, I used a stamp set by Craft Sensations by Grafix from the Netherlands and 2 stamps from Technique Junkies. I also used a variety of papers, my Copics, sequins, sentiments and some glitter pens to decorate the cards. 


Coffee Cup stamp from Craft Sensations 


Ornaments ( paper-pieced ), Holly, Star and Skate by Craft Sensations by Grafix


The other Crafty Elves have also been  keeping very busy making holiday cards and you can take a peek at them all here on their blogs -

Lisa - Life of a BZScrapper

Michael  - World of Michael Trent

Jessica -  Polka Dot Orchard Blog


Thanks so much for visiting Meticulosity once again.. There are only 4 months left until Christmas and we will be returning next month with more inspiration !!

Debra Davison / Meticulosity

Saturday, July 25, 2020

Crafty Elves' Countdown to Christmas - July 2020

Here we are in July --- we are still staying home  for the most part here in Virginia and also wearing mandated masks when we go out.. It has also been near 100 degrees for most of the week AND we just had a power outage while I was starting to work on this post !!  But I am not complaining . I have much to be grateful for .. And that includes all of the holiday cards that I have been making each week along with the other Crafty Elves - Michael, Lisa and Jessica !! 


No big descriptions again this month - just a quick list of supplies .. I did have fun with some favorite Rubber Moon stamps !! And my last card used some cute chipboard die-cuts that I have been hoarding .  If you have any questions about any of my cards for this month, just ask ..


Strathmore Toned Tan Mixed Media paper
Small Talk sentiment - Tim Holtz Ideaology
Tumbled Glass Distress Glitter
Copic Markers


Bird with Star and Tree - Rubber Moon
Moonlighting - Rubber Moon
Small Talk sentiment - Tim Holtz Ideaology


Give Me Paper  - Rubber Moon
Lots of patterned paper !!
Merry Everything paper pad - Recollections
Christmas paper pad - Carta Bella
Small Talk sentiment - Tim Holtz Ideaology
Copic Markers
I changed the words from " my next birthday" to Christmas !!
I loved this so much that I had to make 2 !!


Chipboard Die Cuts
To My Bestie stamp set - Close To My Heart
Copic Marker


The other Crafty Elves have been busy all month too and I can't wait to see what they have created !! You can check them out on their blogs here :

Lisa Reynolds Bzibziak - Life of a BZ Scrapper
Michael Trent - World of Michael Trent
Jessica Pickeral -  Polka Dot Orchard Blog


Thanks so much for following us all these past 7 months as we create our holiday cards each week for our monthly post !! I've already started addressing envelopes so I will be even more ready when Christmas season arrives ..

There is a also fun holiday blog hop right now - hosted by my crafty friend, Crystal Minkler and her team.  She has a Facebook page - Build Your Stash Holiday Cardmakers . Check out their Hop HERE for all of the info . I will be linking up these 5 cards of  mine throughout today.


Debra Davison / Meticulosity

Saturday, April 25, 2020

Crafty Elves' Countdown to Christmas - April 2020

Well, we have been staying at home since my March post due to COVID-19. I will admit that I'm not feeling too creative these days but if I set my mind to it and get started, I find that it really does relax me and takes my mind off of the craziness we are all dealing with. This post will be short since I am finishing it up after 2 long shifts at the hospital - nothing like waiting until the last minute !! I hope that you are all doing well and dealing with this pandemic as best you can. Are you finding that you are as creative ?? What are you doing to de-stress ?? I'm sure that my Crafty Elf teammates have been very creative and I can't wait for you to see what they have made.


The stamp I used on this first card was purchased at Michaels after Christmas for $1.00 . I don't even have a dog but have many friends who do. And I just couldn't resist this stamp !!

be good for goodness sake

  • Stamp - Recollections Christmas Noel
  • Brutus Monroe washi
  • Tim Holtz Idea-ology Small Talk sticker
  • Kraft card base
  • Red rhinestones


  • Stampers Anonymous Winter Wonder "Noel" stamp
  • Recollections washi
  • Multi-colored rhinestones

My last 2 cards turned into 6 cards. I wanted to make a bookmark card to send to friends along with a book as a Christmas gift . I copied the design from a set of bookmarks I found at the Dollar Spot in Target !! It fits over the corner of a page of your book to hold your place.  I also backed it with paper that you can write a book list on.  Either books that you have read or a list of books you'd like to read.  After I made the first one, I liked them so much that I wanted to make more. And then when I was sitting down to make my last card for this post, I decided to use others stamps in the set to make more. I think they look different enough that it's not considered "cheating" .. What do you think ??


  • Stampers Anonymous Seasonal Scribbles stamp set was used on all remaining cards
  • Recollections washi
  • Removable Double-sided tape to adhere bookmark to card base


Bookmark placed over edge of card showing book list

Please be sure to check out the other Crafty Elf creations.. Links below -

Michael Trent - World of Michael Trent
Lisa Reynolds- Bzibziak - Life of a BZScrapper
Jessica Pickeral - Polka Dot Orchard Blog

Thanks so much for following along with us as we continue to make a Christmas card each week throughout 2020. Have you started your holiday cards yet ?? Take care, wear a mask in public and stay safe .. Do something each day just for you .. Create a Christmas card along with us. And we will see you next month on May 25 with more Crafty Elf shenanigans !!


Debra Davison - Meticulosity

Tuesday, February 25, 2020

Crafty Elves' Countdown to Christmas - February 2020

February has basically kicked my butt !! Despite getting a flu shot, I came down with a whopping case of Influenza A AND a nasty bronchitis. Right before Valentines Day, I thought I was getting over a bit of a cold. Couldn't have been more wrong !! But I think the worst is behind me and I'm excited to be here to show you my cards for February. Remember that Michael and Jessica are joining along with me and Lisa as we create a Christmas card each week all throughout 2020. 


For my first card, I chose the Forest Friends Snow Globe stamp from Impression Obsession., designed by  Alesa Baker.


  • I started by stamping the image twice - once on a blue background and again on a light brown paper, making sure I captured the complete base of the globe. Versafine Clair Nocturne ink was used. 
  • I fussy-cut the globe and base and adhered them onto a metallic border card.
  • The image was colored with a variety of my favorite markers - Tombows and Faber-Castells.
  • I added glitter to the pink tree.
  • A sentiment from Crate Paper was adhered to the top of the card.   

The next stamp I chose to use is Nordic Town, designed by my talented friend Lindsay Ostrom, also   for Impression Obsession .


  • I stamped the image on watercolor paper with Versafine Clair Nocturne ink and cut the panel to fit on the front of a dark brown card base.
  • The image was colored with my favorite markers.
  • A strip of red glitter washi was placed along the bottom of the row of houses.
  • Two strips of narrow gold-marbled washi were placed across the top of the panel, leaving a small space between the 2.
  • A My Mind's Eye ephemera sentiment was popped up with foam tabs below the gold strips of washi.
This next stamp is going to be used every holiday from here forward !! From Fun Stampers Journey - Sparkly Christmas - is just too much fun and oh so true ..  Just a simple image but after adding a few sequins, I was sure I had a new Christmas classic !!

  • The image was stamped on a scrap piece of pale blue paper with  Memento Dew Drops - Cottage Ivy and cut to fit my card base.
  • I cut 2 coordinating scrap pieces of Christmas-patterned paper to mat the stamped image. The red dotted paper is glittered.
  • I adhered the papers at an angle. The red to the green, then the stamped base to the red. I am OCD about straight lines and often mount images at an angle to give myself a break !!
  • The completed matted image was adhered to a white card base.
  • Numerous sequins in a variety of holiday colors and sizes were attached to the sentiment.
For my last project, I pulled out a stamped base that I made several years ago when I was stamping with a group of friends. I remember liking the background so much that I made several to use at a later date. And when I was destashing a few weeks ago, I found them again !!


  • I stamped the paint stroke in 3 colors on a peachy-pink card base in 3 colors. It looks like I used 2 coordinating greens and a reddish ink . This is from an older Stampin' Up set - Work of Art .
  • At the bottom right, I stamped the sentiment - from a Crate Paper stamp set I found at Tuesday Morning -  with a Memento Dew Drops - Cottage Ivy ink. 
  • In the center of the paint strokes, I mounted a Crate Paper snow-globe shaker sticker. It is filled with snow and has to be one of the the prettiest stickers EVER made !!!

I'm thrilled that Michael has joined me on my crazy journey as I make a Christmas card each week throughout 2020. Head over to his blog at World of Michael Trent for some more inspiration  I'm also sure that Lisa at Life of a BZscrapper and her crafty partner, Jessica from Polka Dot Orchard were just full of great ideas for our second Crafty Elves post of the year !!

Have you started your holiday cards yet ?? Do you plan to stay ahead of the holiday rush and get your cards,  envelope-addressing and inside the card stamping done throughout the year along with us ?? We would love to hear your ideas for staying organized this holiday season. 

Thank you for visiting Meticulosity.
Until next time, Stay Creative.


Debra Davison / Meticulosity

Thursday, July 25, 2019

Crafty Elves' Countdown to Christmas - July

It's Christmas in July for the Crafty Elves !! Lisa - aka BZScrapper - and I have been making  a Christmas card each week / 4 or more each month and blogging about it on the 25th of each month . It's been a challenge for me to make holiday cards this month. Here in Virginia Beach, we have had temperatures in the high 90's for a few weeks and to tell you the truth, I was not in a Christmas mood. But I actually did play some holiday music and use a Christmas coffee mug while making a few of these cards to help me get in the holiday spirit. This post will combine a few different  Design Team projects for me as you will see in my descriptions. After you see my cards, be sure to stop by Lisa's blog to see her always  amazing creations !!


For my first card, I used a Hero Arts set - Origami Happy Holidays . I stamped the paper airplane image onto green and red patterned paper and also Neenah Stardust White cardstock. They were then fussy-cut and adhered to an embossed white card. I stamped a sentiment from the same stamp set onto a piece of snowflake patterned paper, cut it out with a tag punch, stapled it and then adhered it to the bottom right side of the card. This was made for my Italian penpal and friend, Letizia !! She recently bought a fun custom stamp with her address and a paper airplane on it, so this set immediately made me think of her !!


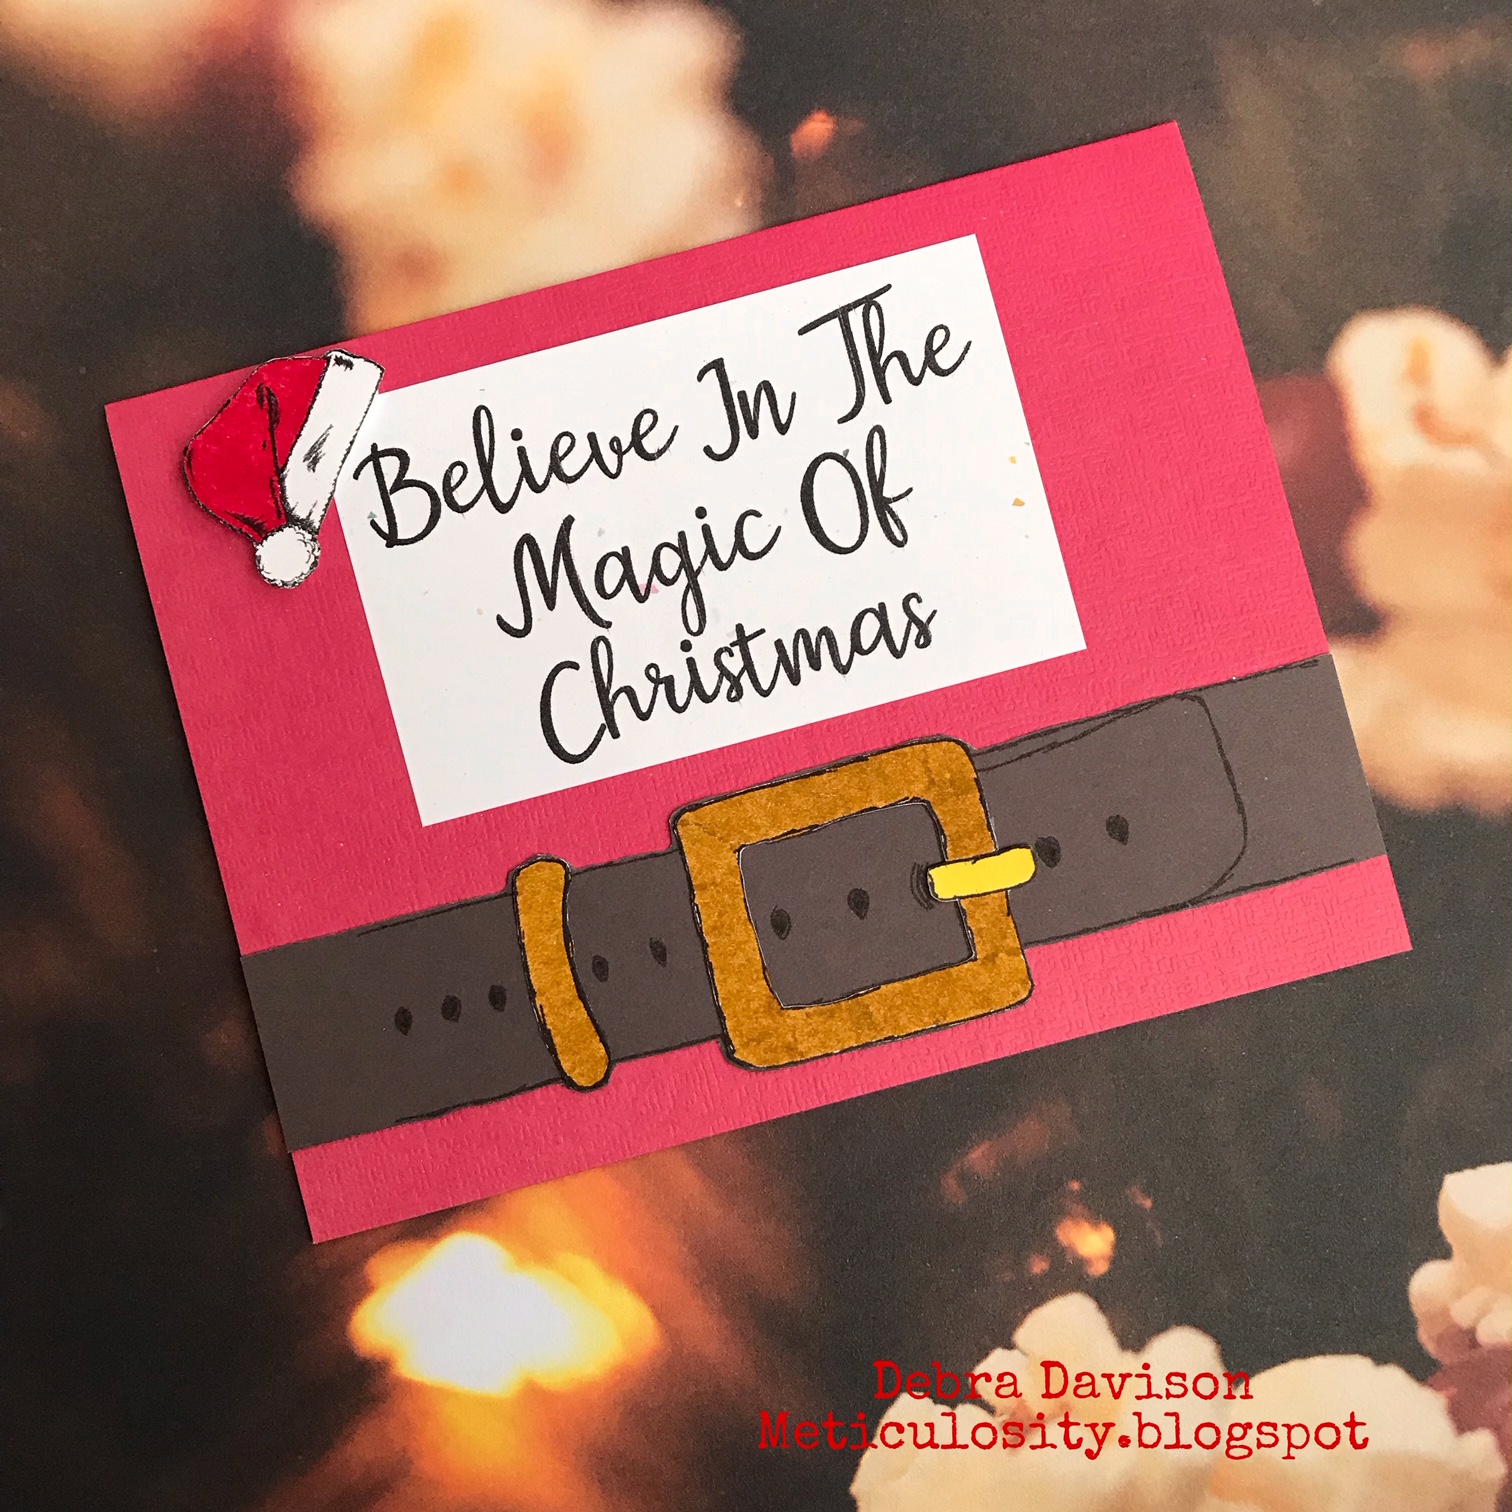
My next card is made with a fun digi stamp set from Polka Dot Orchard - Magic of Christmas . It was designed by my very talented friend and teammate on the Polka Dot Orchard Design Team, Crystal Minkler. We are having a Christmas in July Instagram Blog Hop with the Polk Dot Orchard Team starting today and we hope that you will join us. You can find my post at @djdavison814 on  IG and follow through from there. For this card, I printed the belt, sentiment and Santa hat. The belt was printed on both white and a gray-brown cardstock. I cut out the belt from the gray paper and the buckle and belt loop from white cardstock.The buckle and loop were then colored and adhered on the belt. The Santa hat was also colored.I adhered the sentiment and belt to a red card base.  I then popped the Santa hat up on the corner  of the sentiment with foam tabs. This was a fun card to make !!

 . 

My next card was made with a few favorite stamps from Rubber Moon  -  Merriment by Kae Pea and a house stamp by Joanna Taylor. The house stamp I used is no longer available but the Snowman's House stamp is almost identical. I stamped the Merriment moons on  the top left side of a piece of snowflake patterned paper. The house was stamped on a piece of watercolor paper, colored, cut out into a square and adhered to the lower right of the snowflake paper.  I then stamped the word "merriment" under the house image. I had also stamped the moons on a piece of patterned paper, cut them out and adhered them to the snowflake paper ( I colored one of the moons yellow ). The snowflake paper was adhered to a Kraft cardstock base and a piece of Watercolor Words washi by Rubber Moon was placed down the left side of the card. I love making holiday cards in non-traditional colors !! Do you have a favorite color combo for holiday cards besides red and green ??


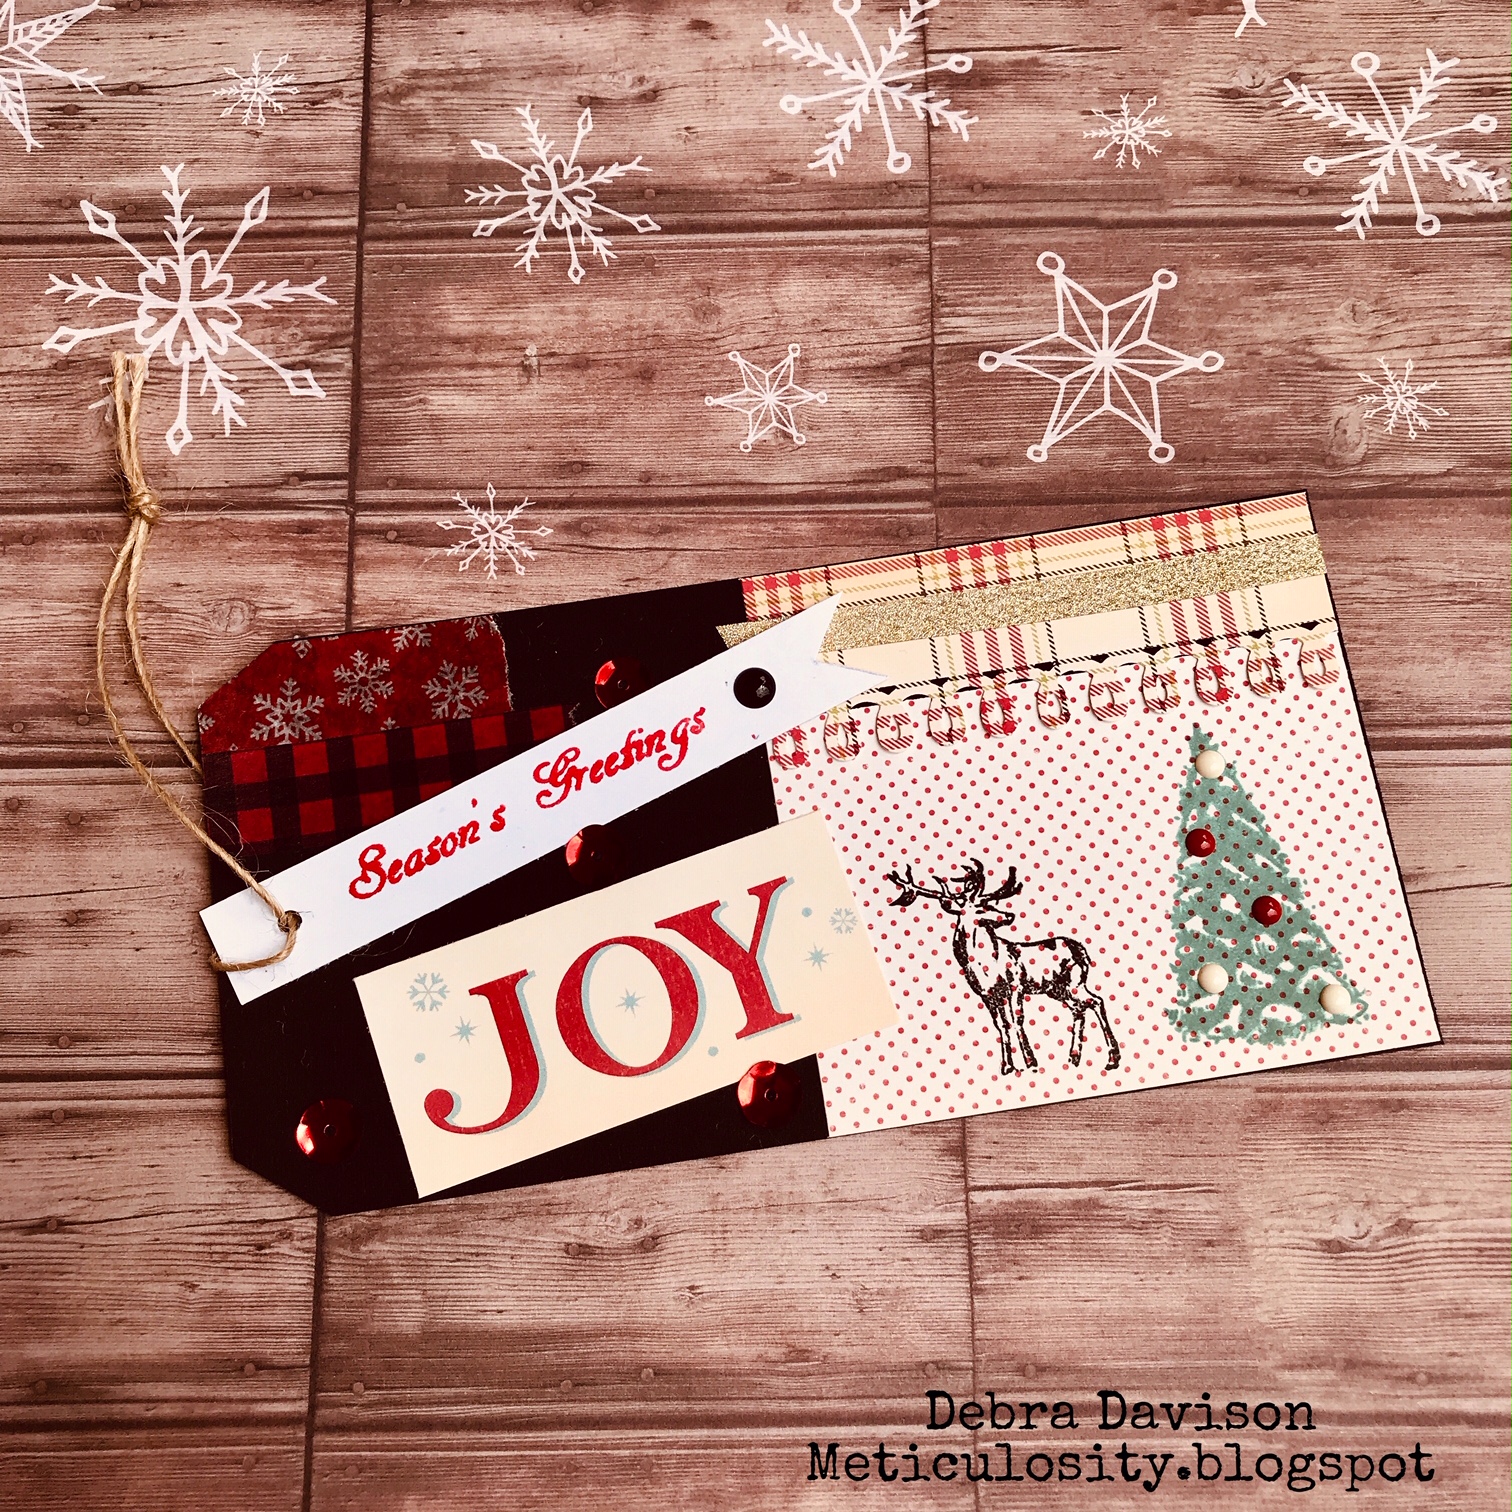
Last but not least is a card/tag for my Christmas in July post at Anthony's Paper Craft. The team is also celebrating Christmas in July by using  some fabulous holiday/Christmas stamps . I used the Winter Scene stamp set that has an amazing variety of smaller stamps suitable for  tags and cards !! I stamped a tree and a deer onto a piece of dotted paper , then used a fun paper punch to make a plaid border that I adhered above the tree. A piece of gold glitter washi was then placed on the plaid border. This entire image was adhered to the bottom half of a black tag. On the upper half of the tag, I adhered a few pieces of washi - snowflake and plaid. The word JOY was adhered at an angle next to the deer.  I then stamped "Seasons Greetings" onto a piece of white cardstock, made a banner out of it and hung it from the hole in the tag.I adhered a  piece of ledger paper to the back of the card to write a holiday greeting on. 


Thank you for joining me for this celebration of Christmas in July.  I really am thrilled to be on several fabulous Design Teams and it was fun to combine these 4 projects in this post !! Make sure you go to Lisa's blog  - Life of a BZscrapper to see what she came up with this month !!

Thanks so much for visiting Meticulosity as we try to inspire you into some holiday spirit as we create a Christmas card each week. We hope to see you back here again on August 25 !!

Until then, Stay Creative !!!


Debra Davison / Meticulosity


Saturday, July 13, 2019

Petals for the Pittmans

I am here today to  tell you about my involvement in a fundraiser - Petals for the Pittmans -  for a member of our creative community,  Larissa Collins Pittman. She and her husband Gary are facing some difficult medical challenges. You can read all the fundraiser details  at the Polka Dot Orchard Blog. I was given a digi design to use and absolutely love it . It is one of many digis that will be included in an exclusive set by Polka Dot Orchard  that will be available to purchase in their Etsy shop for a limited time only . Anyone who links up any floral project will be eligible for one of many prizes.  If you use the exclusive digi set,  you will get a bonus entry for prizes. We hope that you are inspired to become involved and create along with us.


My card uses a sunflower digi by Phyllis Harris, made exclusively for this fundraiser. It was perfect for me because I love to fussy-cut. 

  • On a yellow card base, I adhered a piece of  Studio Calico Lemon Lush paper. I cut the paper to include the words - Hello, Today, Forever, Life, The Best is Yet To Come and Stop Everything & Dance.
  • I printed the sunflowers, fussy-cut them and then colored them with a collection of my favorite markers.
  • The sunflowers were popped up with some foam tabs. 
  • A gold glitter pen was used to highlight some areas on the petals.
The Polka Dot Orchard Design Team has created some wonderful cards and I hope that you will take a look at all of them. Please take some time to go to the Polka Dot Orchard blog and get inspired.  And be sure to look at the floral digi set made especially for this fundraiser.All proceeds from this  set in the Etsy shop will go to the Pittmans. 

Thank you so much for visiting Meticulosity once again .

Debra Davison / Meticulosity

Wednesday, June 26, 2019

June Cookies - Take 2

Our inspiration at If You Give a Crafter a Cookie for Challenge #120 is about all things fruity.  When I saw this picture, I immediately thought of a great big glass of iced tea for some reason !! Probably because of my  fun new digi stamp set  from Polka Dot Orchard . I often have Pineapple or Strawberry Iced Tea at Starbucks  and they are delicious !!


The digi stamp set that I used for my card is called Endless Potential and it's only one of many fabulous sets  from Polka Dot Orchard.  And it seemed like the stars were aligned for me to use this set after I saw what my guy brought back from his latest trip to Wal-Mart. A large Sun Tea Pitcher !!


When Life Give You Lemons, Make Iced Tea

  • I printed the fruity background, the iced tea cup and the sentiment on Neenah Stardust White cardstock.
  • I cut the fruity background to fit on an A2 card and adhered it with my Scotch Pink ATG gun.
  • The cup and background were colored with my favorite assortment of markers and colored pencils. I also used a fun Citrus Marker Set from Tombow for the first time !! How perfect ..
  • I cut the sentiment, mounted it onto a piece of lime green cardstock and adhered it at a diagonal on the upper left side of the card with foam squares.
  • The iced tea glass was also adhered with foam squares.
  • Golden rhinestones were placed in the center of all of the large flowers on the background.


I'm sure our Design Team has come up with some fun projects for this Challenge. Take a look at them here. We would also love for you to link up something before July 11.  Be inspired by the entire picture, the fruits, or the colors and start creating !! 

Enjoy your summer with a big glass of  Creativi - TEA !!


Debra Davison / Meticulosity

Thursday, May 9, 2019

Coffee Hop - Spring 2019 / Take 1

It's been  a crazy few weeks and I'm just now posing my first link for the 2019 Spring/Summer Coffee Lovers Blog Hop .. I used a fun set from Polka Dot Orchard - Live Life Like a Butterfly .

 .
  • I mounted a scrap piece of yellow paper onto a Kraft card base. 
  • The coffee cup image and the sentiment were both printed on Neenah Stardust White Cardstock. I also printed the coffee cup on Kraft cardstock and a piece of multi-colored patterned paper and cut out the coffee center and the saucer. 
  • I colored the Kraft coffee center image, the cup  and the butterflies at the top of the cup  with a variety of my favorite markers - Brea Reese, Flair, Sharpie and Faber-Castell.
  • I placed a strip of blue floral washi with gold highlights at the top of the sentiment, which was then mounted with foam squares at the top left corner.
I liked this image so much that I made several other notecards with the images. I punched several butterflies from a sheet of undeveloped x-ray film that I got when I worked in the ICU !! These were attached to the cards with my Tim Holtz Tiny Stapler.  I also used several Candy Dot embellishments.


The  2019 Spring/Summer Coffee Lovers Blog Hop will allow links to be posted until 11:55 pm PST on May 10. There are already over 1000 projects posted !! I hope that you like my cards . I'll be mailing them to a friend who wanted some coffee-themed cards to send to her friends.


Thank you so much for visiting Meticulosity !!
 Be sure to check out the Polka Dot Orchard Blog .
They will be having some fun giveaways during the Hop.

Debra Davison/ Meticulosity

Sunday, March 31, 2019

Coffee & Cards with Deb & Celeste - 3/31

Once again, Celeste and I are here with our cards and coffee. Hard to believe that April is almost here and it is Spring already. I know that I am ready for spring temperatures and flowers and spending time on the deck with my morning coffee. Our inspiration for this month was a picture found by Celeste.  We hope that you will be inspired too !!


I wanted a bright, cheerful, flowery card to get me in a springtime mood. I immediately thought of a digi stamp set from the Etsy shop - Polka Dot Orchard. I am one of the first members of their Design Team and look forward to showing you  many of their fun stamps !! I used the digi set " It's Your Day ".


  • I started off with a Molly & Rex watercolor card base. It had matching colors to the patterned paper that I used.
  • The digi images of the cup, teapot and sentiment were printed out on a piece of patterned paper - American Crafts "Lucky Charm" Sunny Day paper . This paper is brightly colored floral on one side and a pretty pale pink on the other. Perfect for this card !!
  • I fussy cut the cup and teapot and trimmed the sentiment to fit the card.
  • I colored areas of the teapot with a pink Brea Reese marker .
  • Pralines & Cream Fairy Dust Glitter by Clearsnap  was placed on the top area of the cup with Tombow MONO Aqua Liquid Glue. I think it looks just like my tea after adding some cream and honey.
  • I placed a strip of turquoise glitter washi along the bottom area of the card base.
  • The teapot was positioned to look like it was pouring tea into the cup. 
  • I adhered the sentiment in  the upper left corner. All paper elements were adhered with MONO Adhesive+ Permanent Runner.

I hope that you will take a look at all of the fun digi stamp sets over at Polka Dot Orchard. I had fun with this card and actually made 2 more. I can't wait to see what Celeste has come up with to celebrate Spring -- head over to her blog @ Crafting Junky and take a look.  For my drink this month, I chose tea to go with my card. I am drinking a Matcha Green tea from a bright red floral Starbucks cup . With just a hint of cream and a bit of honey !!  Brian just refinished a small wrought iron table and 2 chairs that were his parents and they are outside on our deck.  I will be drinking my morning coffee and tea out there whenever I can !!


Thank you for visiting Meticulosity.


Debra Davison